
 Menu
MenuPitman Arm Master Service Kit - 20388
For Intermediate (Class 4,5,6) & Heavy Duty (Class 7,8)

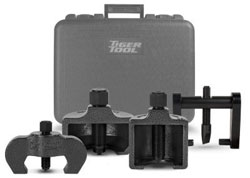
20388
From intermediate to heavy duty trucks, Pitman Arm Master Service Kit service a variety of pitman arms.
Includes:
- 10386 Pitman Arm Spreader
- 10385 Pitman Arm Puller (M100)
- 10389 Pitman Arm Puller (M110)
- 10388 Pitman Arm Puller (Intermediate)
Operating Instructions:
Pitman Arm Puller (M100): 10385
Note: Always keep the forcing screw threads clean and well lubricated. Lubricate with oil before every use. Failure to do so can result in thread seizure in the tool.
- Remove set screws from pitman arm or bend lock tabs for removal of retaining bolt. Refer to the manufacturer’s service manual to determine model and retaining method.
- Some applications may also require removal of some/all of the fasteners in the sector shaft cover to allow the tool to slide over the pitman arm.
- Back the forcing screw out and slip casting over the pitman arm until the forcing screw lines up with the center of the sector shaft. Ensure that the forcing screw will not damage the threads in the end of the sector shaft. On some models, it may be necessary to install a bolt into the threaded end of the sector shaft for the pulling operation.
- Once the tool is properly positioned on the pitman arm, apply 1⁄2" drive impact to the forcing screw until the pitman arm is removed from the sector shaft.
Pitman Arm Spreader: 10386
Note: Keep the threads of the screw clean and lubricated at all times to lessen friction. Use quality oil on threads. We donot recommend using anti-seize!
- Remove the nut from the thru bolt.
- Remove the thru bolt from the pitman arm.
- Slide the two link arms onto each side of the pulling bar with the pulling pins entering the thru bolt hole of the pitman arms. Align the wedge with the parting line of the pitman arm and hand tighten the screw until the assembly is tight and in proper position.
- Continue to turn the forcing screw with a wrench or air ratchet until the wedge has spread the pitman arm sufficiently to allow the pitman arm to be removed. Use caution not to spread the arm excessively.
Note: Refer to steering box manufacturer’s service instructions or vehicle service manual for further information.
Pitman Arm Puller (Intermediate): 10388
Note: Always keep the forcing screw threads clean and well lubricated. Lubricate with oil before every use. Failure to do so can result in thread seizure in the tool.
- Remove the retaining nut and washer from the sector arm.
- Back out the forcing screw. Slip casting over the pitman arm until the forcing screw lines up with the center of the sector shaft.
- Once the tool is properly positioned on the pitman arm, apply 1⁄2" drive impact to the forcing screw until the pitman arm is removed from the sector shaft.
Pitman Arm Puller (M110): 10389
Note: Always keep the forcing screw threads clean and well lubricated. Lubricate with oil before every use. Failure to do so can result in thread seizure in the tool.
- Refer to the manufacturer’s service manual to determine model and retaining method.
- Some applications may also require removal of some/all of the fasteners in the sector shaft cover to allow the 10389 tool to slide over the pitman arm.
- Back forcing screw out and slip casting over the pitman arm until the forcing screw lines up with the center of the sector shaft. Ensure that the forcing screw will not damage the threads in the end of the sector shaft. On some models, it may be necessary to install a bolt into the threaded end of the sector shaft for the pulling operation.
- Once the tool is properly positioned on the pitman arm, apply ½ drive impact to the forcing screw until the pitman arm is removed from the sector shaft.
Warranty Policy
Tiger Tool International Incorporated (“Tiger Tool”) warrants to its customers that cast portions of its tools are free from defects in workmanship and materials for as long as the original purchaser owns the tool.
Tiger Tool warrants to its customers that threaded areas, bolts and machined components in or of its tools will not fail due to defects in workmanship and materials for a warranty period of two years from the date of original purchase.
Tiger Tool warrants to its customers that hydraulic components will not fail due to defects in workmanship and materials for a warranty period of one year from the date of original purchase.
For warranty service a customer must return the tool freight prepaid along with original proof of purchase to TIGER TOOL INTERNATIONAL INCORPORATED.
When a customer seeks warranty service with respect to a tool and that tool is covered by a TIGER TOOL warranty, TIGER TOOL may at its option repair the tool, replace the tool or refund the purchase price for the tool.
New unused product that is returned to tiger tool as a result of the customers error or due to inventory adjustment will be subject to a twenty percent (20%) restock/rework fee with authorized RGA number otherwise a 30% restocking fee will apply.
Highly Recommended


Track Your Order

