
 Menu
MenuHeavy Duty Technician’s Kit - 20201, 20301, 20401
For Heavy Duty (Class 7,8)

20201, 20301, 20401
Used for servicing brake components on class 7 and 8 trucks and buses, steering and driveline. It features a variety of popular tools.
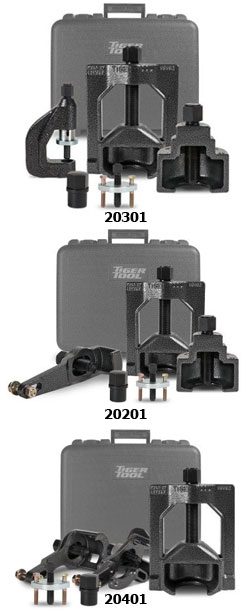
20301 - Includes
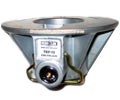
- 10201 Bearing Cup Installer – Traditional Bolt Retained
- 10102 Heavy Duty Universal Joint Puller
- 10406 Manual Slack Adjuster Puller
- 10301 7/8" Tie Rod End Remover
- 10501 Brake Clevis Pin Press
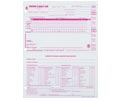
20201 - Includes
- 10201 Bearing Cup Installer – Traditional Bolt Retained
- 10102 Heavy Duty Universal Joint Puller
- 10406 Manual Slack Adjuster Puller
- 10407 Rockwell Automatic Slack Adjuster Puller
- 10301 7/8" Tie Rod End Remover
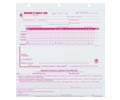
20401 - Includes
- 10102 Heavy Duty Universal Joint Puller
- 10301 7/8" Tie Rod End Remover
- 10201 Bearing Cup Installer – Traditional Bolt Retained
- 10410 Haldex self-adjusting slack puller
- 10409 Gunite, Brunner and Bendix self-adjusting slack puller
Note 10102 Failure to check the spherical thrust washer and replace as necessary may result in unrepairable damage to your U-Joint Puller Glove Casting. Preventative maintenance as outlined on the following page will ensure many years of use from your tiger tool puller. Failure to perform preventative maintenance will void your warranty.
Operating Instructions
- 10102 U-Joint Puller
- 10201 Bearing Cup Installer
- 10301 Tie Rod End Remover
- 10501 Rockwell Slack Adjuster Puller
- 10406 Manual Slack Adjuster Puller
- 10407 Rockwell Automatic Slack Adjuster Puller
- 10409 Gunite/Brunner/Bendix Slack Adjuster Puller
- 10410 Haldex Multi Adjustable Slack Adjuster Puller
Note 10406 Threads must be clean and well lubricated at allt imes. Do not use over 1/2" impact wrench doing so will void warranty
10102 U-Joint Puller
- Remove all fasteners from bearing cups.
- Slip the U-Joint Puller over the yoke of the driveline.
- Turn the tool’s forcing screw clockwise with either an air or hand wrench. (Note: reverse thread)
- Once bearing cup has been removed, repeat the process on the remaining bearing cups. The 10102 U-Joint Puller may be used with up to a 1" impact wrench without voiding warranty.
Preventative Maintenance
Keep forcing screw clean and lubricated at all times. Failure to maintain the spherical thrust washer located inside the glove will result in excessive wear to the part. Check and lubricate this part (lubricate load bearing surface in glove, under cap, on both sides of spherical washer) periodically and replace as necessary. Contact your Dealer or Tiger Tool for replacement washers. (We recommend SAE 30 lube for the threads and EP ’with molly grease’).
10201 Bearing Cup Installer
- Ensure all parts to be assembled are clean and/or greased where applicable.
- Double check all needle bearings are present and placed correctly.
- Start pressing bearing cup into yoke by hand, making sure the U-Joint cross and bearing cup bolt holes line up.
- Place installer onto bearing cup, threading bolts into the yoke.
- Using an impact or hand wrench, turn forcing screw until cup is flush to yoke.
- Remove tool, and install bearing cup bolts.
10301 Tie Rod End Remover
- Remove any original nuts and/or cotter pins from parts to be separated.
- Select correct tool according to thread size of tie rod.
- Spin the tool completely onto the threaded arm.
- Back tool off one complete turn.
- Strike the remover with a hammer; tie rod will become loose.
- Remove tool and part to be removed will drop off.
10501 Rockwell Slack Adjuster Puller
Threads must be clean and well lubricated at all times. Do not use over a 1⁄2" impact wrench—doing so will void warranty
- Back out the forcing screw.
- Pull back the spring-loaded plunger and slip the tool over the clevis pin.
- Turn forcing screw by hand or with an impact wrench; the tool will shear the cotter pin.
- Once the pin is free of the clevis, back out the forcing screw and remove the tool.
10406 Manual Slack Adjuster Puller
Threads must be clean and well lubricated at all times. Do not use over 1⁄2" impact wrench—doing so will void warranty.
- Remove clevis from the end of the slack adjuster with the Tiger Tool 10501 Brake Clevis Pin Press.
- With the forcing screw backed fully out, slip the puller onto the slack adjuster.
- Turn the forcing screw by hand or with an impact wrench.
- Slack adjuster will drop off when free.
10407 Rockwell Automatic Slack Adjuster Puller
Threads must be clean and well lubricated at all times. Do not use over 1⁄2" impact wrench. Doing so will void warranty.
- Remove clevis from the end of the slack adjuster with the Tiger Tool 10501 Brake Clevis Pin Press.
- With the forcing screw backed fully out, slip the puller onto the slack adjuster.
- Attach the tool to slack adjuster through clevis hole and tighten.
- Turn the forcing screw by hand or with an impact wrench.
- Slack adjuster will drop off when free.
10409 Gunite/Brunner/Bendix Slack Adjuster Puller
- Remove clevis from the end of the slack adjuster with the Tiger Tool 10501 Brake Clevis Pin Press.
- With the forcing screw backed fully out, slip the puller onto the slack adjuster.
- Attach tool to slack adjuster through clevis hole and tighten.
- Turn the forcing screw by hand or with an impact wrench.
- Slack adjuster will drop off when free.
10410 Haldex Multi Adjustable Slack Adjuster Puller
- Remove clevis pin and clevis from the end of the slack adjuster with the Tiger 10501 Brake Clevis Pin Press.
- Select proper arm and attach to puller main body with 1⁄2" x 1" bolt supplied. Do not tighten at this time. Note the straight arm is for older style Haldex slacks while the bent arm is for newer angled and/or offset Haldex slack adjusters.
- With forcing screw fully backed out, slip the puller onto the slack adjuster.
- Insert 1⁄2" x 2 1⁄2" bolt through clevis pin hole and puller arm slot. Secure with washer and nut by hand.
- Tighten 1⁄2" x 1" and 1⁄2" x 2 1⁄2" to securely mount puller to slack adjuster.
- Turn the forcing screw with hand or 1⁄2" impact wrench.
- Slack adjuster will drop off when free.
Warranty Policy
Tiger Tool International Incorporated (“Tiger Tool”) warrants to its customers that cast portions of its tools are free from defects in workmanship and materials for as long as the original purchaser owns the tool.
Tiger Tool warrants to its customers that threaded areas, bolts and machined components in or of its tools will not fail due to defects in workmanship and materials for a warranty period of two years from the date of original purchase.
Tiger Tool warrants to its customers that hydraulic components will not fail due to defects in workmanship and materials for a warranty period of one year from the date of original purchase.
For warranty service a customer must return the tool freight prepaid along with original proof of purchase to TIGER TOOL INTERNATIONAL INCORPORATED.
When a customer seeks warranty service with respect to a tool and that tool is covered by a TIGER TOOL warranty, TIGER TOOL may at its option repair the tool, replace the tool or refund the purchase price for the tool.
New unused product that is returned to tiger tool as a result of the customers error or due to inventory adjustment will be subject to a twenty percent (20%) restock/rework fee with authorized RGA number otherwise a 30% restocking fee will apply.
Tiger Tool 10102 Heavy Duty Universal Joint Puller Best Way To Disassemble Drivelines (2.32 Min)
Bolt-Retained Bearing Cup Installer 10201 (30 Sec)
Tiger Tool Tie Rod End Remover Kit 10310 (47 Sec)
Slack Adjuster Puller 10406 (19 Sec)
Rockwell Slack Adjuster Puller 10407 (34 Sec)
Tiger Tool 10102 Heavy Duty Universal Joint Puller Best Way To Disassemble Drivelines (2.31 Min)
Bolt-Retained Bearing Cup Installer 10201 (30 Sec)
Tiger Tool Tie Rod End Remover Kit 10310 (47 Sec)
Slack Adjuster Puller 10406 (19 Sec)
Brake Clevis Pin Press 10501 (35 Sec)
Tiger Tool 10102 Heavy Duty Universal Joint Puller Best Way To Disassemble Drivelines (2.31)
Bolt-Retained Bearing Cup Installer 10201 (30 Sec)
Tiger Tool Tie Rod End Remover Kit 10310 (47 Sec)
Highly Recommended


Track Your Order

