
 Menu
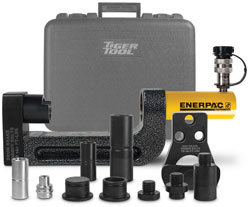
MenuHydraulic Wheel Stud Press Service Kit - 10616
For Intermediate (Class 4, 5, 6) & Heavy Duty (Class 7, 8)

10616
With 10 tons of pressing power, the hydraulic wheel stud service kit provides effective and fast installation or removal of wheel studs on most drum brake and disc applications.
Requires 10,000 PSI hydraulic pump
Features
- Eliminates risk of damages to the following:
- Hubs
- Seals
- Wheel Bearings
- Wheel Studs
- Pressing Power: 10 Tons
- Remove and Install Wheel Stud Effectively
- Disc and Drum Brakes Application
Operating Instructions
Disk Brake - Wheel Stud Removal
- Thread the 10 ton cylinder into the threaded end of the L-frame.
- Attach the hydraulic power supply to the cylinder (Use any 10,000 psi air/hydraulic pump).
- Install the Fork Foot Install Plate into the opposing end of the L-frame like shown.
- Select the appropriate stud pusher adapter (long or short, depending on stud length) and thread into the hydraulic cylinder.
- Position the 10616 over the wheel stud and apply hydraulic pressure until the wheel stud is released from the hub flange.
- Upon removal of all wheel studs, remove the removal adapters from the hydraulic cylinder.
Disk Brake - Wheel Stud Installation
Thoroughly remove any corrosion, rust or burrs from the rear side of the hub to ensure proper wheel stud installation.
- Select the Fork Foot Install Plate from the kit and insert it into the Fork Foot on the end of the L-frame.
- Select the threaded cylinder adapter and thread onto hydraulic cylinder.
- Insert the new wheel stud through the backside of the hub by hand and align the splines.
- For installation of 3⁄4" or 22 mm studs you must select the appropriate aluminum sleeve and place it over the protruding threaded area of the stud. Then place the installation tube over the aluminum sleeve.
Note: For installation of 1 1⁄8" studs, the aluminum sleeve is not required. Use the installation tube only - Position the 10616 over the wheel stud/installation tube and continue to apply hydraulic pressure until the stud is securely seated into the hub flange.
Drum Brake - Wheel Stud Removal
- Thread the 10 ton cylinder into the threaded end of the L-frame.
- Attach the hydraulic power supply to the cylinder (Use any 10,000 psi air/hydraulic pump)
- Install the Drum Brake Foot into the opposing end of the L-frame like shown and insert stud remover cup if necessary.
- Select the appropriate stud pusher adapter (long or short, depending on stud length) and thread into the hydraulic cylinder.
- Position the 10616 over the wheel stud and apply hydraulic pressure until the wheel stud is released from the hub flange.
- Upon removal of all wheel studs, remove the removal adapters from the hydraulic cylinder and opposing end of the L-frame to prepare for installation.
Drum Brake - Wheel Stud Installation
Thoroughly remove any corrosion, rust or burrs from the rear side of the hub to ensure proper wheel stud installation.
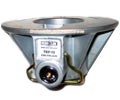
- Select the Stud Installer Anvil from the kit and insert it into the end of the L-frame.
- Select the threaded cylinder adapter and thread onto hydraulic cylinder.
- Insert the new wheel stud through the backside of the hub by hand and align the splines.
- For installation of 3⁄4" or 22 mm studs you must select the appropriate aluminum sleeve and place it over the protruding threaded area of the stud. Then place the installation tube over the aluminum sleeve.
For installation of 1 1⁄8" studs the aluminum sleeve is not required. Use the installation tube only. - Position the 10616 over the wheel stud/installation tube and continue to apply hydraulic pressure until the stud is securely seated into the hub flange.
Warranty Policy
Tiger Tool International Incorporated (“Tiger Tool”) warrants to its customers that cast portions of its tools are free from defects in workmanship and materials for as long as the original purchaser owns the tool.
Tiger Tool warrants to its customers that threaded areas, bolts and machined components in or of its tools will not fail due to defects in workmanship and materials for a warranty period of two years from the date of original purchase.
Tiger Tool warrants to its customers that hydraulic components will not fail due to defects in workmanship and materials for a warranty period of one year from the date of original purchase.
For warranty service a customer must return the tool freight prepaid along with original proof of purchase to TIGER TOOL INTERNATIONAL INCORPORATED.
When a customer seeks warranty service with respect to a tool and that tool is covered by a TIGER TOOL warranty, TIGER TOOL may at its option repair the tool, replace the tool or refund the purchase price for the tool.
New unused product that is returned to tiger tool as a result of the customers error or due to inventory adjustment will be subject to a twenty percent (20%) restock/rework fee with authorized RGA number otherwise a 30% restocking fee will apply.
Highly Recommended


Track Your Order

