
 Menu
MenuTri-Functional Bushing Adapter - 15040, 15041, 15050
For Heavy Duty (Class 7, 8)

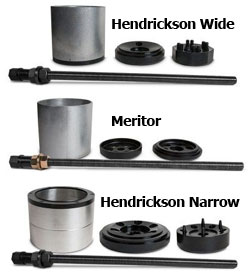
Hendrickson Wide - 15040
Meritor - 15050
Hendrickson Narrow - 15041
Remove and install tri-functional bushing easily while the suspension remains on the trailer. Chose from Meritor, Hendrickson narrow and Hendrickson wide.
Kit must be used with 15000 Pin & Bushing Kit or can alternately be used with 17202 Hydraulic Cylinder. (Please note, when utilizing the 17202, a hydraulic pump will still be required.)
Features:
- High Graded Steel Components
- Durable & Strength
- Resists Corrosion
- Black Oxide Coating
15041 - Hendrickson Narrow Bushing Adapter - Application
- Hendrickson: S24736
15040 - Hendrickson Intraax Bushing Adapter - Operating Instructions
Note: Use replacement parts and accessories provided by tiger tool only. All replacement parts and accessories are available. Keep hydraulic coupler protected when not in use. Dust caps should be used on couplers when not in use to avoid contaminants from entering the hydraulic cylinder and power source. This practice will help to extend the life of this product and ensure continued consistent operation.
Removal of Bushing
- Scribe the bushing orientation on the beam tube and compression tube.
- Assemble tool as shown. The spring pins are not required to line up with the bushing holes during removal.
- Tighten retaining nuts to remove slack. Thread on hammer adapter in the event the bushing becomes seized. Hook up hydraulics and begin removal operation.
- After each 2 inch stroke, re-tighten nuts to take up slack. (Most bushing will require 3-4 adjustments)
Installation of Bushing
- Lubricate the bushing (Use OEM recommended lube) and insert the bushing into compression cylinder.
- Place the plunger on top of the bushing, align the mark on the bushing with the mark on the plunger. The 4 corresponding pins to the bushing type you are installing should seat into the bushing.
- Assemble tool as shown.
- Tighten retaining nuts to remove slack. Thread on hammer adapter in the event the bushing becomes seized. Confirm the plunger is aligned with the scribed mark on the beam tube and the pins are still engaged in the bushing. Hook up hydraulics and begin installation operation. After each 2 inch stroke, retighten nuts to take up slack. (Most bushing will require 3-4 adjustments)
15041 - Hendrickson Vantraax Bushing Adapter - Operating Instructions
Note: Use replacement parts and accessories provided by tiger tool only. All replacement parts and accessories are available. Keep hydraulic coupler protected when not in use. Dust caps should be used on couplers when not in use to avoid contaminants from entering the hydraulic cylinder and power source. This practice will help to extend the life of this product and ensure continued consistent operation.
Removal of Bushing
- Scribe the bushing orientation on the beam tube and compression tube.
- Assemble tool as shown. The spring pins are not required to line up with the bushing holes during removal.
- Tighten retaining nuts to remove slack. Thread on hammer adapter in the event the bushing becomes seized. Hook up hydraulics and begin removal operation.
- After each 2 inch stroke, re-tighten nuts to take up slack. (Most bushing will require 3-4 adjustments)
Installation of Bushing
- Lubricate the bushing (Use OEM recommended lube) and insert the bushing into compression cylinder.
- Place the plunger on top of the bushing, align the mark on the bushing with the mark on the plunger. The 4 corresponding pins to the bushing type you are installing should seat into the bushing.
- Assemble tool as shown.
- Tighten retaining nuts to remove slack. Thread on hammer adapter in the event the bushing becomes seized. Confirm the plunger is aligned with the scribed mark on the beam tube and the pins are still engaged in the bushing. Hook up hydraulics and begin installation operation. After each 2 inch stroke, re-tighten nuts to take up slack. (Most bushing will require 3-4 adjustments)
Highly Recommended


Track Your Order

